
The Pour Formula Painters Figured Out 200 Years Ago (That Most Tutorials Still Skip)
Why your acrylic cells aren’t accidents, why you keep running out of paint — and the calculator built on the actual science.

✦ Transparency note: This article was written by AI and reviewed by the author. All factual claims were independently verified (at least with another prompt) before publication. Mistakes may still happen.
Disclaimer: The information in this post is for educational and informational purposes only. It does not constitute financial, legal, or professional advice. The author is not liable for any financial loss or damages arising from use of this information. Data, pricing, and availability referenced here may be out of date — always verify independently before acting on it.
You ran out of paint mid-pour.
It happens to nearly everyone who tries acrylic pouring for the first time. The canvas is half-covered, the tilt is going beautifully, cells are forming in spirals you didn’t plan for — and then you’re scraping the last desperate drops from four different cups while the paint on the canvas starts to skin over. You add water to stretch it. You tilt faster. The piece is ruined. You’ve wasted an afternoon and $20 in supplies.
The fix isn’t more practice. It’s math. And the math has a history that stretches back further than you’d expect.
What Your Silicone Oil Bottle Has in Common with a Pre-Industrial Painter’s Studio
Before acrylic paint existed — and before tube paint existed — oil painters mixed their own working mediums from scratch.
Linseed oil for flow and drying time. Walnut oil for less yellowing over decades. Poppy oil for a slower dry that gave more time to blend. They ground their own pigments by hand — madder lake, Naples yellow, verdigris — and mixed them to specific consistencies for specific techniques. Glazing required a thin, transparent medium that could be layered over dry underpainting. Impasto required something thick enough to hold the texture of a palette knife stroke for a century.
(By the mid-1800s, commercial tube paints made hand-grinding less common — but painters continued to add mediums for viscosity control throughout the oil painting tradition, right up to the present day.)
What they were managing, without our vocabulary for it, was viscosity — the resistance of a fluid to flow. Too thick and the paint wouldn’t move. Too thin and it wouldn’t cover, wouldn’t hold, wouldn’t do what the hand asked of it. The ratio of pigment to medium wasn’t aesthetic intuition. It was empirical knowledge, passed studio to studio, refined over generations.
Modern acrylic pouring runs on the same principle. The medium has changed — Floetrol, GAC 800, Liquitex Pouring Medium instead of linseed oil — but the underlying physics has not moved in centuries.
And those cells, the marble-ring patterns that define fluid art’s distinctive look? Those have a name too: Bénard convection cells, first documented by physicist Henri Bénard in 1900–1901. When fluids of different densities interact near a surface, they spontaneously organize into repeating cell structures driven by surface tension and density gradients. Silicone oil in acrylic paint does exactly this. You’re not creating happy accidents. You’re demonstrating physics.
This matters, because once you understand what you’re working with, you stop guessing.
The Specific Ways Guessing Goes Wrong
“Eyeball it” works the same way most intuition works: reliably enough until it doesn’t, and catastrophically when it fails. Here’s what guessing doesn’t account for:
Canvas depth. A 16×20” gallery-wrap canvas with 1.5” sides isn’t 320 square inches of paintable surface — it’s closer to 428 square inches once all four sides are included. That’s a 34% difference in required paint volume. If you’re hanging the piece without a frame (which is the whole point of gallery wrap), every side is visible. Every side needs coverage.
Technique. A dirty pour — all colours loaded into one cup — and a ring pour — colours layered concentrically — require completely different volumes and cup distributions. A Dutch pour, which relies on a heat gun or straw to push thin paint across the surface, needs a lower viscosity medium ratio than a string pull, which needs higher pigment concentration in a smaller volume.
Medium ratio. The difference between a 1:1 paint-to-medium ratio (thicker, better cell retention) and a 1:3 ratio (thinner, better spread and movement) isn’t just consistency — it changes the total fluid volume you need to cover the same canvas area.
Colour distribution. If you want four colours in roughly equal visual presence, they each need specific cup volumes — not “roughly the same,” because different pigments have different opacities and different densities that affect how they interact when poured together.
Getting one of these wrong produces a result you can’t reproduce or recover.
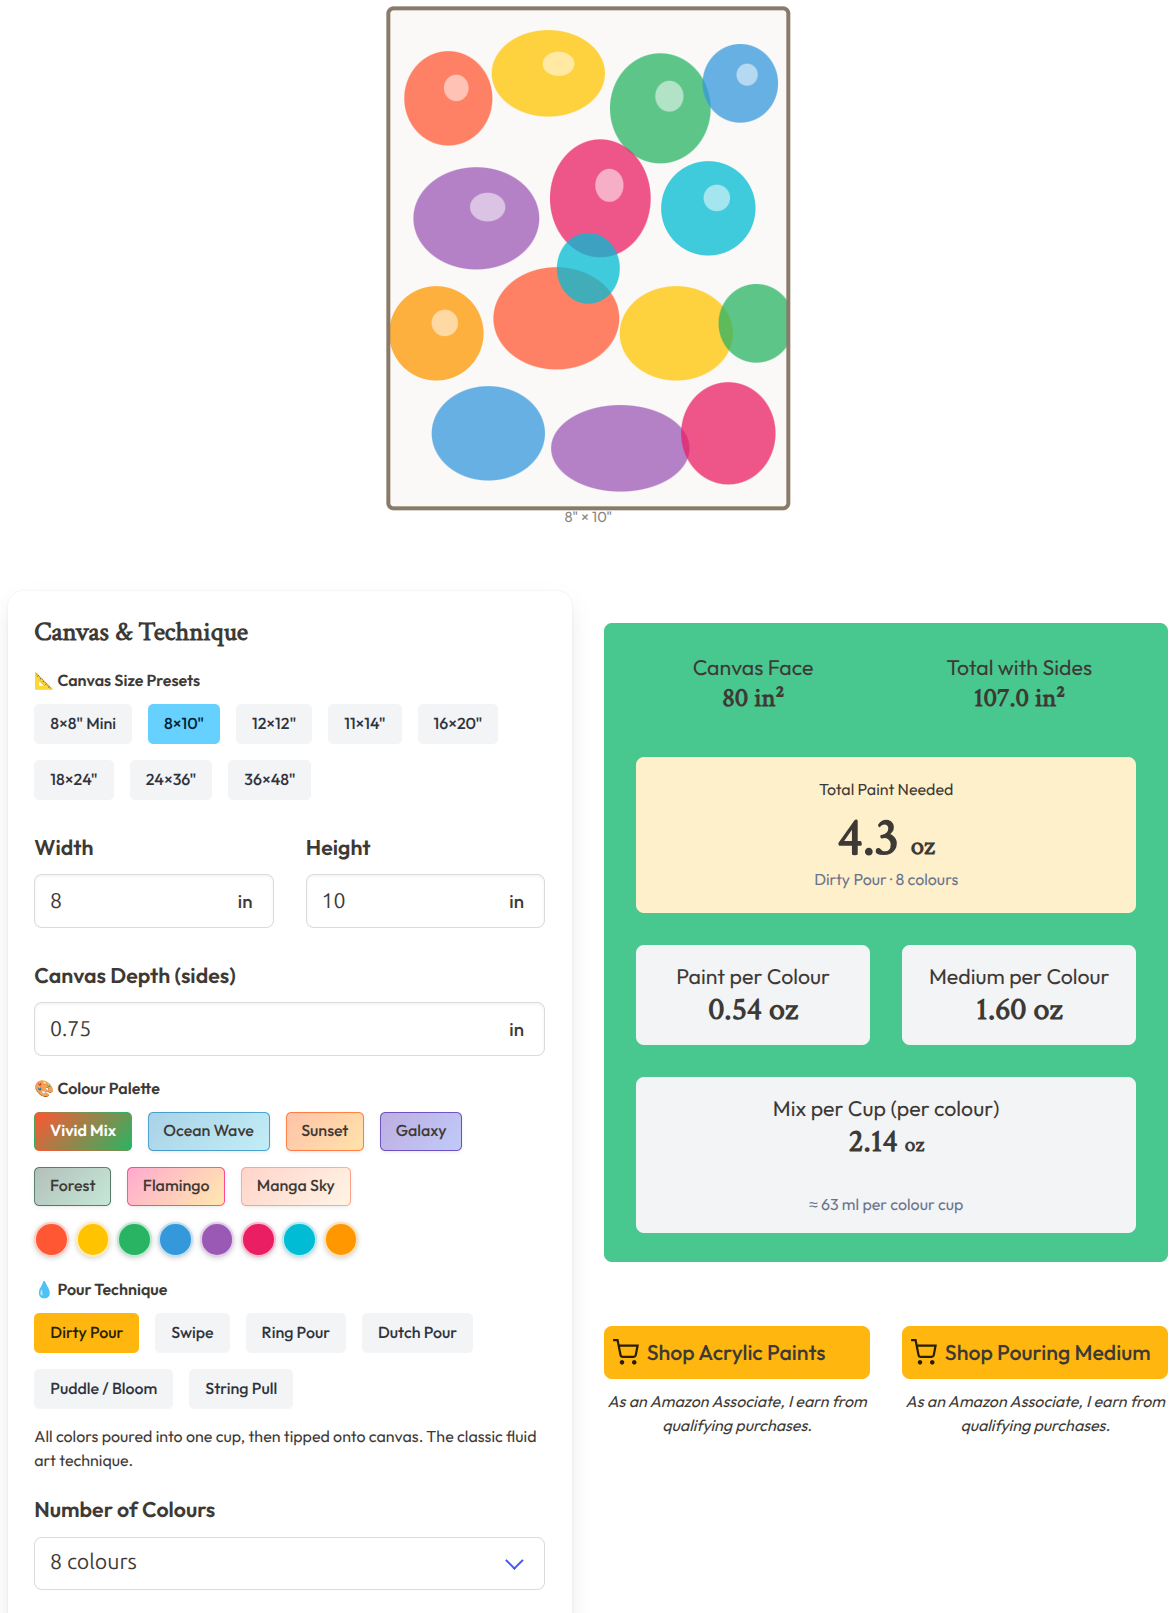
What the Calculator Does
→ Open the Acrylic Pouring Paint Calculator on riatto.ovh
The tool takes your canvas dimensions, technique, colour count, and medium ratio and returns exact cup volumes. A worked example:
Canvas: 16×20”, 1.5” gallery-wrap depth
Technique: Dirty Pour
Colours: 4
Medium ratio: 1:2
The calculator outputs total mixed volume, per-colour cup volumes, and medium volume per cup. You mix to those numbers before you open a single paint bottle. No more mid-pour scrambling.
The Six Techniques
The calculator handles six pour styles, and each one has a different logic:
Dirty pour — all colours loaded into one cup, poured from a single point and tilted. Large central volume; you control the colour ratio by layering order in the cup.
Swipe — a base colour covers the canvas first, then accent colours are applied in lines and swiped with a palette knife or card. Two-stage pour with different volume needs for base versus accent.
Ring pour (tree ring) — colours poured concentrically from the same point in deliberate sequence. The layering order in the cup affects which colours end up outermost as the paint spreads.
Dutch pour — paint poured across the canvas and then pushed with a heat gun or breath through a straw. Requires a thinner medium ratio (1:3 or more) for the flow to work; the calculator adjusts total volume accordingly.
Puddle pour — multiple separate puddle points across the canvas, then the whole canvas tilted to let them merge. Requires the most careful per-puddle volume distribution; improvising here leaves blank canvas between puddles or colours that merge before they should.
String pull — string or yarn dipped in loaded paint and dragged across the surface in a single motion. Smaller total volumes but higher pigment concentration; different cup logic entirely.
The tool handles the arithmetic for all six. You just pick your technique.
Canvas Presets and Palette Presets
For common canvas sizes (from 8×8” up to 36×48”), preset buttons populate dimensions automatically. For colour selection, named palette presets — Vivid Mix, Ocean Wave, Galaxy — give thematic starting points for colour cup loading without requiring you to choose from scratch every time.
The Studio Angle Most Tutorials Never Mention
Here’s a use case that rarely appears in pouring guides, and it may be the most commercially interesting thing you can do with fluid art.
Illustrators — particularly those working in manga, graphic novel, or concept art styles — regularly need organic, non-repeating textured backgrounds: water, sky, cloud, energy fields, nebula effects. Generating these digitally requires either expensive texture packs, lengthy manual digital painting, or procedural generation that often looks exactly like what it is.
The alternative: pour them.
A well-executed fluid pour on a 12×16” canvas produces a unique, never-repeatable texture asset. Scanned at 600 DPI on a flatbed scanner, it becomes a 7,200×9,600 pixel file — larger than most print-ready illustration files. Colour-graded in Photoshop or Procreate, the same pour becomes sky, water, fire, storm, deep space. No two pours are identical. No one else has your textures.
These can be licensed as digital assets, sold as print backgrounds to other artists, or used exclusively in your own illustration work. A pour that costs $8 in supplies can produce a texture asset that sells as a digital download dozens of times. The calculator’s Studio Edition section covers this workflow specifically — canvas sizes compatible with standard flatbed scanners, surface preparation recommendations (the difference in cell retention between raw canvas and gessoed surface), and a rough pricing model for digital asset sales.
The Manga Sky method, documented in the tool, is particularly useful: a Dutch pour technique using diluted paint on a 9×12” unprimed canvas produces cloud-like formations that composite cleanly over digital line art. Scan at 600 DPI, desaturate, use as a multiply or overlay layer. Professional background texture in 20 minutes.
Before You Pour: Hand-Stretch Your Canvas
If you’re working at the scale the scanning workflow requires, or if you’re producing pieces for sale, there’s a strong argument for stretching your own canvas rather than buying pre-stretched frames.
Pre-stretched store canvases often use 0.75” bars. For fluid art, that’s a problem: wet pouring medium pools behind the canvas during drying and can warp or bow thinner frames. For gallery-wrap pieces, 1.5” to 2” bar depth keeps the canvas surface raised clear of the table and lets it dry flat. For scanning-workflow canvases, you want to control the exact dimensions — not work around whatever the art supply store stocks that week.
The Canvas Stretcher Bar Calculator at Riatto Lab computes everything you need: linear feet of bar stock, whether cross-braces are required (automatically triggered for widths over 18”), keying wedge count, canvas cloth dimensions including fold-over, and a 10% material waste buffer. The tool’s historical notes trace the stretcher bar to 16th-century Venetian painters — who pioneered the shift from rigid wood panels to portable canvas supports — with the expandable key system refined in the 17th century to allow tensioning after gessoing.
Two tools, used together, get you from raw materials to correctly calculated paint volumes before a drop is poured.
🐾 A Word from Mochi, Chief Curiosity Officer
Fluid Dynamics Observation Unit · Riatto Lab
okay so. I was just sitting on the counter. 🪑 just... existing. sniffing the silicone oil bottle because it smelled like a question I needed to answer.
and then my paw slipped. 🙊
the bottle went sideways. the Floetrol went everywhere. and the 16×20” canvas that was sitting down there? it got... visited.
here is what I noticed: the cells that formed when I accidentally knocked everything over were STUNNING. like, genuinely better than what the human had been trying to do for 45 minutes. 👀 I’m not saying I did it on purpose. I’m just saying the results speak for themselves.
I then performed follow-up research by sitting in the exact centre of the wet canvas and doing a slow, dignified spin. 🌀 the humans called it “a disaster.” I call it feline-assisted Bénard cell enhancement. very different things.
the Floetrol on the floor had excellent pour consistency, by the way. covered approximately 1,600 square inches. smooth. no brush marks. shame about the no-canvas situation. 😐
anyway. someone used the calculator after all that. turns out if you calculate the quantities first, none of this happens.
interesting. we will consider this information. 🐾
— Mochi
Chief Curiosity Officer, Fluid Dynamics Observation Unit
Paw-Print Standard Certified · “if it fits, I pour”
Try It
→ Acrylic Pouring Paint Calculator — riatto.ovh
→ Canvas Stretcher Bar Calculator — for hand-stretching your own frames
Both free. No sign-up required.
Tried it on a real pour? Drop the canvas size, technique, and how it turned out in the comments. Disasters welcome — we’ve all been there.
→ Watch: Acrylic Pouring in action on YouTube
→ Acrylic Pouring Starter Kit on Amazon
Affiliate disclosure: This post contains Amazon affiliate links. I may earn a small commission at no extra cost to you.
References
Fluid art coverage standard (approx. 1 fl oz per 25 sq in) — common professional studio practice; verified across multiple pouring resources
Bénard, H. (1900). Les tourbillons cellulaires dans une nappe liquide — original documentation of Bénard convection cells (public domain)
Mayer, Ralph. The Artist’s Handbook of Materials and Techniques — historical oil painter viscosity and medium practices (available to borrow via Internet Archive: archive.org/details/artistshandbooko00maye)
ASTM D4236 — Standard Practice for Labeling Art Materials for Chronic Health Hazards (public domain standard reference)
Riatto Lab: Acrylic Pouring Paint Calculator
Riatto Lab: Canvas Stretcher Bar Calculator
About this article
This post was written by AI and reviewed by the author. All factual claims were verified (with another prompt) at the time of publication. Final perspective, editorial judgement, and any opinions expressed are the author’s own.Published on riatto.substack.com · February 2026